
Russian Manicure: What is it and how is it done?
What is a Russian manicure?
The Russian nail method is a nail care technique that focuses on achieving flawlessly clean and well-groomed nails. Unlike traditional manicures, the Russian manicure, which can also be used for pedicures, is a dry procedure, meaning the nails are not soaked. A Russian manicure is more intricate and precise, using a special nail drill to clean and remove excess cuticle skin around the nail bed, along with gentle filing and the removal of dead skin cells to reveal healthier, smoother nails. The Russian nail method ensures a longer-lasting manicure and promotes the growth of stronger, healthier nails.

What is the difference between the Russian manicure and the conventional manicure?
While both Russian manicures and traditional or gel manicures clean, shape, and enhance the overall appearance of nails, they differ significantly in their approach and the level of detail involved. In a traditional or gel manicure, the nail is soaked, then the cuticle is gently pushed back and trimmed. Then, the nails are shaped, filed, and, finally, polished. Cuticle work is often minimal, and the emphasis is on achieving a polished look.The Russian nail method is the manicure for those obsessed with a clean beauty aesthetic. This chic method meticulously cleans and preps the nail beds to ensure that the nails are free from any dead skin or imperfections. The Russian nail method is a dry process of filing, cutting, and removing the cuticle with electric drill bits entirely for a clean look and feel. The Russian manicure can prevent the dry cracking of cuticles or hangnails, thus extending the longevity of the manicure.
Also, a Russian manicure will last much longer than a conventional manicure. A traditional manicure may last about week, but when properly done, a Russian manicure or pedicure will last for around three weeks.
How is the Russian manicure done?
Russian nails involve several steps to achieve the desired clean aesthetic appearance. Here's a step-by-step guide to help you understand the detailed process:
Step 1: Nail Preparation and Cleaning
The first step in a Russian manicure or pedicure is to prepare the nails by gently removing any existing nail polish. Use a soft brush to clean the skin surrounding the nails. Remember to remove any dirt or dead skin cells from under the nails or around the edges. Our Nail Cleanser Prep pads wipe away dust & oils is for long-lasting, chip-free gel manicure.
Step 2: Cuticle Removal and Nail Buffing
Next, remove the extra skin around the nail bed with an electrical nail file or drill. Use the same drill to remove the cuticles under the nail bed for a close, clean trim. Prepare the nail bed for polishing by using an electronic buffer to remove any ridges or imperfections on the nail surface. This will enhance the natural shine of the nails, giving them a healthy, clean appearance.If you don’t have an electronic buffer, c'est la vie! Our 4-sided buffer nail block is a must-have tool for preparing the nail bed. Each side will help you to file, shape, buff and shine your nails to Russian manicure perfection!
Step 3: Gentle Filing
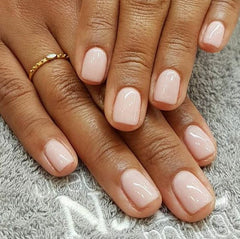
Use a fine-grit nail file to shape your nails according to your preference. You can choose between square, oval, almond, or any other desired shape. Gently file the edges of your nails, moving in one direction to prevent damage. 
Step 4: Paint Your Nails
Apply your chosen nail polish product. Start with a base coat to protect your nails and make sure not to leave any space between the skin and the nail. If using Le Mini Macaron’s gel polish, (we hope you are!) our special formulated gel polish includes base coat, color and top coat all in one bottle! Our unique 1-step, 3-in-1 gel polish formula dries under our mini LED lamp in just 30 seconds, and in our Le Maxi in 60 seconds!
Step 5: Hydration and Moisturization
To complete the Russian manicure, apply a hydrating cuticle oil or cream to nourish the nails and surrounding skin. This helps to maintain the health and strength of the nails, preventing dryness and brittleness. 
FAQs
What is so special about Russian manicures?
Russian manicures are special because they use an electric file (e-file) to precisely clean the cuticle area, creating an ultra-clean nail base. This results in a smoother finish and better polish adhesion.
Why is a Russian manicure so expensive?
Russian manicures are more expensive because they require advanced training, precision tools, and more time. Skilled technicians and detailed prep contribute to the higher cost.
Why do Russian manicures last so long?
They last longer because the nail plate is thoroughly cleaned and prepped, allowing gel or polish to adhere more securely and reduce lifting.
What are the cons of Russian manicures?
The main cons are that they require a highly trained technician, take more time, and can cause irritation or nail damage if done incorrectly.
How to remove a Russian gel manicure?
A Russian gel manicure is removed by filing the top layer, soaking nails in acetone, and gently pushing off the softened gel without forcing it.


